Thanks Mick. It will be interesting to see what happens with mine. You have spurred me to put mine in some tubs of water for the next month and a half before the tank comes in order to give it a good head start. That is what is recommended on the mopani label, but I have not done it before.
newshound- The jack posts are on prefab concrete deck supports. They have an 11" by 11" base. Engineering estimates are that a square foot can support about 15000 lbs, but this is highly dependent on the type of soil involved.
Tank setup update
Moderator: LoachForumModerators
-
Keith Wolcott

- Posts: 720
- Joined: Sun Mar 04, 2007 1:49 pm
- Location: Charleston, Illinois USA
Just a small update.
I have been soaking the Mopani wood for a week now and it is certainly leaching quite a bit of color.
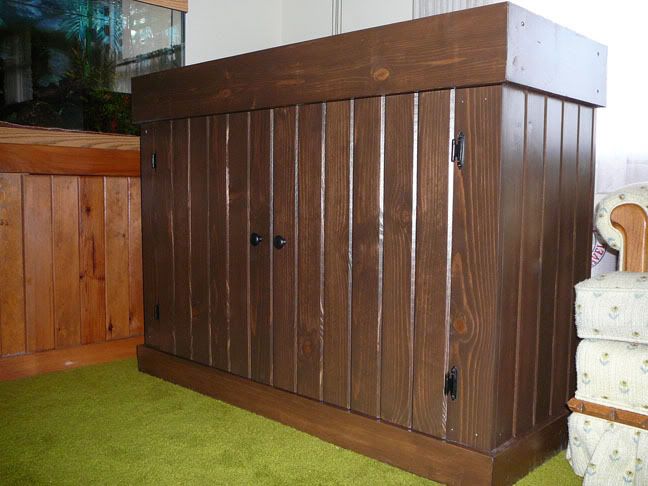
I also took two days and built another stand for the current 75 gallon tank. Since I plan a water bridge between it and the 340 gallon, they have to have the same water level. You can see in the picture that it had to be about 7.5 inches taller. It also matches the large stand.
I have been soaking the Mopani wood for a week now and it is certainly leaching quite a bit of color.
I also took two days and built another stand for the current 75 gallon tank. Since I plan a water bridge between it and the 340 gallon, they have to have the same water level. You can see in the picture that it had to be about 7.5 inches taller. It also matches the large stand.

Keith, you want to take a vacation by the beach this summer and slam together a couple of stands for me??? 
Lovely.
Lovely.
books. gotta love em!
http://www.Apaperbackexchange.com
http://www.Apaperbackexchange.com

Nice work on the new stand. Have you though about the water-bridge design much?
Lately, I've been thinking about a new water-bridge design that would be more loach friendly and bigger so that large fish could swim through it easily.
It would be more loach friendly in that there will be fewer reflections and less light in it.
I was thinking of making it out of oak plywood on three sides with a glass front. The plywood would be glued and screwed together then sealed with an epoxy resin on all sides that would be exposed to water. I'd stain the rest of the plywood that isn't exposed to water. Then I'd silicone in the pieces of glass into place. Then I'd give it a leak test. If it passed that, I'd glue or velcro on any decorative mouldings or trim pieces to match my hoods and stands.
For waterproofing, I was looking at this Sweetwater Epoxy because it's fish safe and has many colors to choose from.
http://www.aquaticeco.com/index.cfm/fus ... 3/cid/3035
The challenge in this design is making it waterproof and airtight. With the acrylic waterbridges that has never been a problem.
You could always just paint the outside of the acrylic bridges. Could end up a very creative project.
books. gotta love em!
http://www.Apaperbackexchange.com
http://www.Apaperbackexchange.com
-
brett_fishman

- Posts: 675
- Joined: Wed Dec 20, 2006 3:00 pm
- Location: BC, Canada
- Contact:
-
Gary Stanton

- Posts: 1412
- Joined: Sun Jan 21, 2007 7:31 pm
- Location: Lake Tahoe, CA
I don't know what diameter you are striving for, but here's some 4.5" acrylic for a reasonable price.chefkeith wrote: Have you though about the water-bridge design much?
Lately, I've been thinking about a new water-bridge design that would be more loach friendly and bigger so that large fish could swim through it easily.
The challenge in this design is making it waterproof and airtight. With the acrylic waterbridges that has never been a problem.
http://www.aquaticeco.com/index.cfm/fus ... 9/cid/2074
What I've don't is take PVC and cut out a 100 degree section lengthwise and then take the acrylic and cut it into three 120 degree lengthwise sections. This way you get three times the length of each acrylic piece. Then you glue the acrylic piece over the PVC.
Larger diameter PVC can also be covered with an acrylic window by heating flat acrylic with a torch and form it around the PVC. These methods are way cheaper than 100% clear and you're right about the fish feeling more comfortable.
"Beware of the fish people, they are the true enemy."
-- Frank Zappa, speech to a pro-choice rally in Los Angeles around 1989-90
-- Frank Zappa, speech to a pro-choice rally in Los Angeles around 1989-90
-
Gary Stanton
- Posts: 1412
- Joined: Sun Jan 21, 2007 7:31 pm
- Location: Lake Tahoe, CA
We gave up on elbows quick. I guess you could make "windows" out of flat stuff, but why bother?chefkeith wrote:Gary- That ain't a bad idea at all. Very clever and it hadn't crossed my mind doing it that way. You could probably make elbows that way too.
The loaches would like that 100x more than clear pipe all the way around.
"Beware of the fish people, they are the true enemy."
-- Frank Zappa, speech to a pro-choice rally in Los Angeles around 1989-90
-- Frank Zappa, speech to a pro-choice rally in Los Angeles around 1989-90
The blind spot in the pvc elbow could be problematic. If I have a sick fish, I'll usually find them in the water bridge because they like the extra water flow. IME, they'll hide right in that elbow area. That's one of the reasons why I stopped using the clear pvc pipe bridges and made all my bridges with acrylic sheet instead.
-
Keith Wolcott
- Posts: 720
- Joined: Sun Mar 04, 2007 1:49 pm
- Location: Charleston, Illinois USA
Thanks Sheri. Being landlocked here in Illinois makes the beach sound very attractive.
Chefkeith- Thanks for bringing up the topic of water bridges. I have been thinking about it quite a bit and was going to ask you about it.
Gary- Thanks for your good ideas on putting windows in pipe and for the great source if clear pipe. It is cheaper by a factor of two than the best that I had found.
I have been looking into clear PVC pipe and also had the idea that the fish would be more comfortable if it was not so open. I thought that I might try gluing sand and pebbles on the inside bottom and back of the pipe. I have also looked into bending the pipe by heating it. The biggest problem is that the maximum bending radius is 5 times the diameter of the pipe (see http://www.harvel.com/pipeclearpvc-heat-bend.asp). This means that for my purposes, 6" pipe is too big and 4" or 4.5" pipe would be about the largest that I could use. The extruded pipe has forces that will be released when it is heated and thus may cause problems. Has anyone tried this with extruded pipe? The cell cast pipe does not have this problem, but it is much more expensive ($170 vs $40).
Another way to go rather than bending it, is to buy clear elbows (I also do not want blind spots where I can't see the fish), but they cost $200 apiece, so that is not an option unless there is a much cheaper source out there somewhere.
The last option, and the option that I am thinking of using, is to cut the pipe at an angle and use the weld-on solvent to glue it back together to get a corner of around 100 or 110 degrees (so the angle is not so sharp for the fish) to go down into the tanks on each end. With this method, along with sand and pebbles siliconed onto the inside bottom and back, I am thinking that the bridge could be removed about every 2-4 weeks and cleaned out with a brush and then reinstalled. What do you think of this plan? Problems? Improvements?
I had not thought of using sealed plywood. This idea has a lot of potential. As you say, it can be made to match the woodwork in the stands and it can be made any size or shape. I'll have to think about it.
I've never tried bending acrylic pipe with heat. I'm not sure how that would work out.Has anyone tried this with extruded pipe?
Cutting the pipe at an angle and cementing them could work. I've never tried that either though.
For the substrate idea is a very good one, but I don't think silicone adheres all that well too acrylic if you were to try to glue the substrate to it inside the pipe. That's a good idea if you can figure out how to do it though. The substrate idea would work even better combined with the sealed plywood idea I had.
There are a few other drawbacks from having bridges made out of any clear pipe. The curve of the pipe will distort the view of anything inside it. Also the pipe may become an eye sore after the novelty of it wears off.
here's a pic of my old clear pipe water bridge.

-
Gary Stanton
- Posts: 1412
- Joined: Sun Jan 21, 2007 7:31 pm
- Location: Lake Tahoe, CA
I've bent lots of flat acrylic, plexiglas even lexan with no problem. I've also used the sand inside method on metal tubing with success. My guess is that doing the radius bend on acrylic with sand would be successful. Packing the sand is important. A wet towel applied after forming cools instantly.Keith Wolcott wrote: The last option, and the option that I am thinking of using, is to cut the pipe at an angle and use the weld-on solvent to glue it back together to get a corner of around 100 or 110 degrees (so the angle is not so sharp for the fish) to go down into the tanks on each end. With this method, along with sand and pebbles siliconed onto the inside bottom and back, I am thinking that the bridge could be removed about every 2-4 weeks and cleaned out with a brush and then reinstalled. What do you think of this plan? Problems? Improvements?
Making the angles you suggest are tough for me, hopefully you would do better. Taking a regular 90 or 45 and putting windows in might not be too difficult?
"Beware of the fish people, they are the true enemy."
-- Frank Zappa, speech to a pro-choice rally in Los Angeles around 1989-90
-- Frank Zappa, speech to a pro-choice rally in Los Angeles around 1989-90
-
Keith Wolcott
- Posts: 720
- Joined: Sun Mar 04, 2007 1:49 pm
- Location: Charleston, Illinois USA
Thanks for asking, but not much is happening. The 340 gallon tank that I ordered was delayed 6 weeks and now another 4 weeks (They had a problem with a bad batch of glass.). It is now supposed to arrive at the end of May.
In the meantime I have built the 80 gallon R.O water storage tank out of 3/8 inch acrylic. It is installed under the stand and working well for water changes on my 75 gallon tank. I'll try to put some pictures up tonight.
On the plus side, my mopani wood has been soaking for over two months now, so it should be ready for the tank.
I also have obtained a piece of 4.5 inch diameter clear acrylic pipe (from the source that Gary suggested-thank you). Since I learned a bit about working with acrylic when I built the R.O tank, I am ready to cut and bond it back together to get corners for the water bridge.
Who is online
Users browsing this forum: Google [Bot] and 74 guests